

How To Install A New Stereo In An Old Car
How to install a machine stereo
Remove your manufacturing plant stereo and install a new one
Car stereo installation nuts— In this article, nosotros'll walk yous through the procedure of installing a new car stereo. We'll encompass:
- How to remove the manufactory stereo
- How to wire the new receiver — what you need to know to connect it correct
- How to install the new automobile stereo
Delight read over these guidelines before beginning the installation so you'll know what to expect.
Become your toolbox
Y'all'll demand a few tools to become the job washed, but null serious. A couple of screwdrivers and a wrench or socket set for the battery cablevision are near mutual. You'll also need some wire strippers, electrical tape, and a way to make wiring connections – which we'll cover later. 1 of the more important tools you'll need is a panel removal tool to help you safely remove the dash panels without scratching the surfaces or breaking anything.
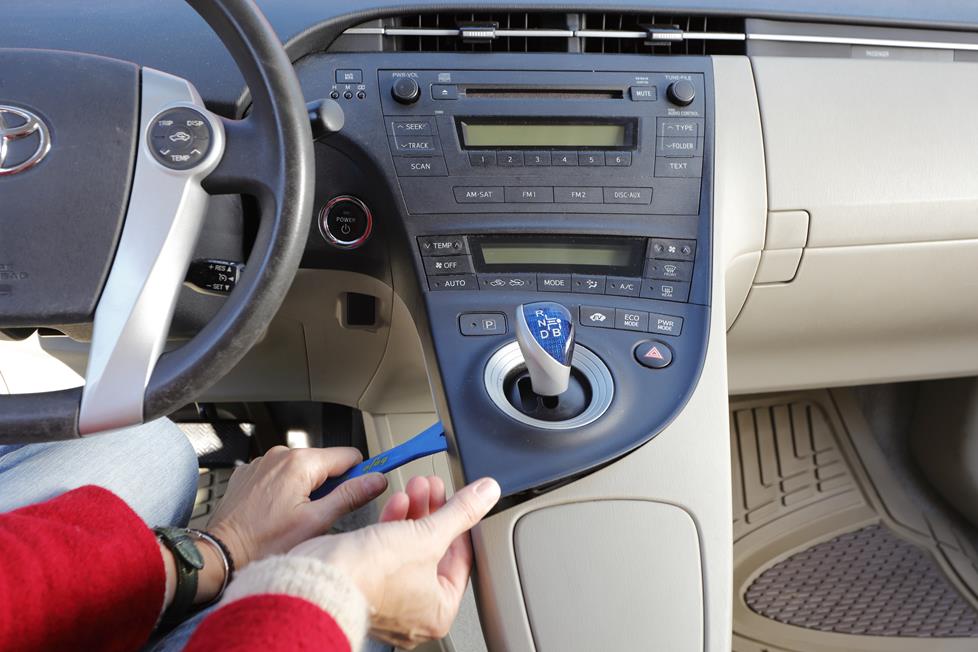
Protect your trim panels by using the right tool for the job.
Scout this video for a footstep-past-step overview of a bones car stereo installation
If yous're looking for a more than visual take, cheque out this video of ane of our senior advisors installing a stereo. He walks you through the procedure from showtime to end and shares a few expert tips along the way.
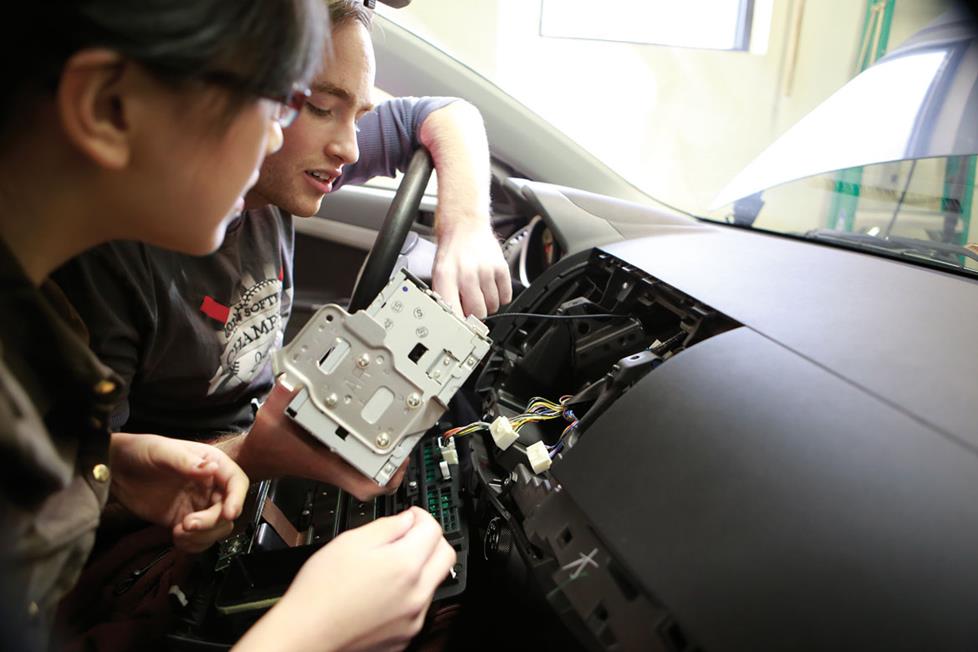
Removing the manufactory stereo
When installing a new stereo in your car, your beginning step volition be to remove the old stereo. It would exist piece of cake to breeze through the removal steps and forget them. But don't blitz! You'll desire to brand sure you lot remember the sequence of these steps, since you lot'll be reversing this process to install a new stereo.
For detailed data on how to remove the factory stereo that's specific to your vehicle, refer to your Crutchfield MasterSheet™ instructions, which walk you through the process step-by-step. Otherwise, you may use the full general guidelines beneath. These instructions are costless with a motorcar stereo purchase, or you can purchase them separately for $9.99. Using MasterSheet instructions with the general guidelines beneath will prove to exist a winning combo.
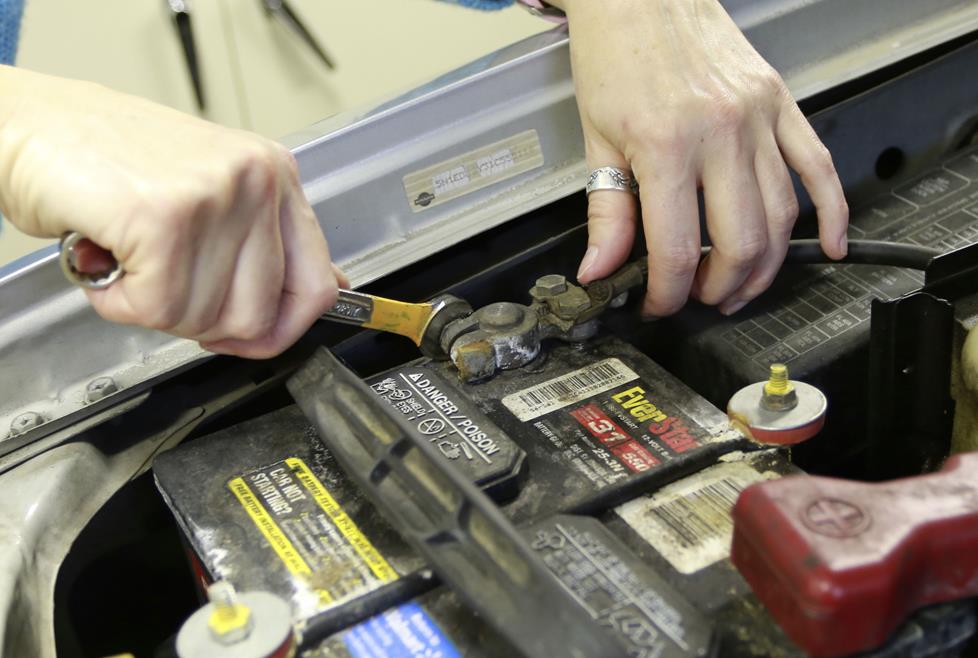
Before you brainstorm, start by setting the parking restriction and removing the negative cable from the automobile bombardment to forestall accidentally short circuiting something.
Your factory stereo will virtually often be mounted in one of the following ways:
- secured in a metal mounting sleeve by leap clips
- bolted to the dash with brackets
- mounted to a rails arrangement inside the dash
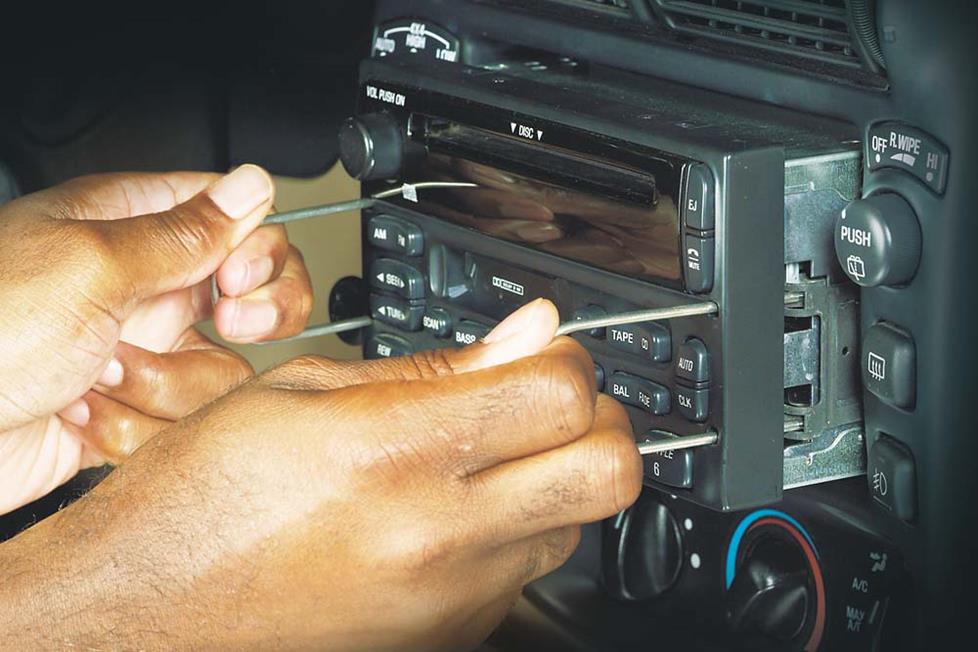
Removing a jump-prune mounted radio
If the stereo is held in by spring clips, y'all'll need a pair of DIN tools. Insert the DIN tools into the holes on either side of the unit until you lot hear a click. The tools serve to release the bound clips and also hook onto the sides of the stereo then that you tin can pull information technology out hands. Spread the tools apart slightly so pull the stereo out of the dash.
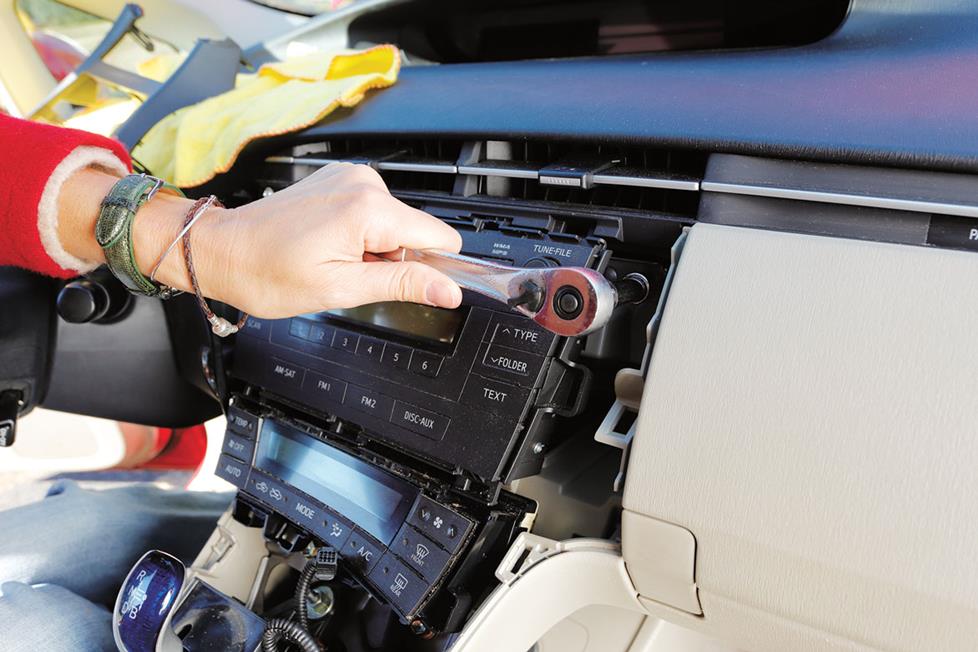
Removing a stereo that's bolted in place
Sometimes, accessing the stereo requires the removal of i or more than trim panels from the dash. You lot may have to (carefully) pry the plastic trim away from the dash (which is often secured past hidden pressure clips), or locate and remove bolts to disassemble other pieces of panel. Once you have gained access to the mill stereo, y'all should be able to see screws that secure the radio to the dash. Remove the screws and pull the stereo from the dash.
Removing a stereo fastened to a rail organization
Some vehicle manufacturers mount the factory radio to a guide rail inside the dash. Once the spring clips or bolts are removed, y'all tin can slide the radio off of the rail. Considering this rail tin can sometimes interfere with the chassis of a new radio, it may accept to be removed likewise. Something to keep in listen: once this is done, you often cannot reinstall the mill radio.
Stereos for older cars
American cars built before the early 1980s often came with a "shaft-style" stereo, which secured to the dash via basics and washers to the correct and left knobs. A shaft-style stereo must be installed from behind the dash. Getting it into position is the tricky role, since your vehicle's wiring, heater controls, and ductwork may be in the way. 1 of our vendors, RetroSound, offers several vintage shaft-style radios with mod features on lath and a versatile mounting organization.
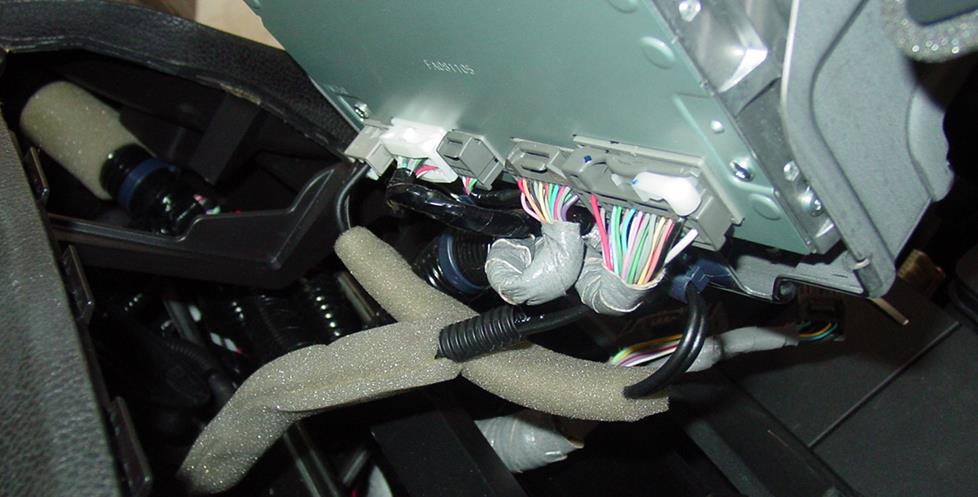
Unplugging the factory stereo
If your vehicle has (or once had) a factory stereo, or if it was pre-wired with a "stereo prep" package, at that place should be at least one plastic wiring harness behind the stereo opening. This plug connects the stereo to your vehicle's electrical system and the speakers. You will need to unplug the factory stereo from the wiring harnesses, and unplug the antenna to complete the removal process.
With the old radio out of the way, it'due south time to focus on the new i. That involves connecting all the wires and so installing the stereo in the dash.
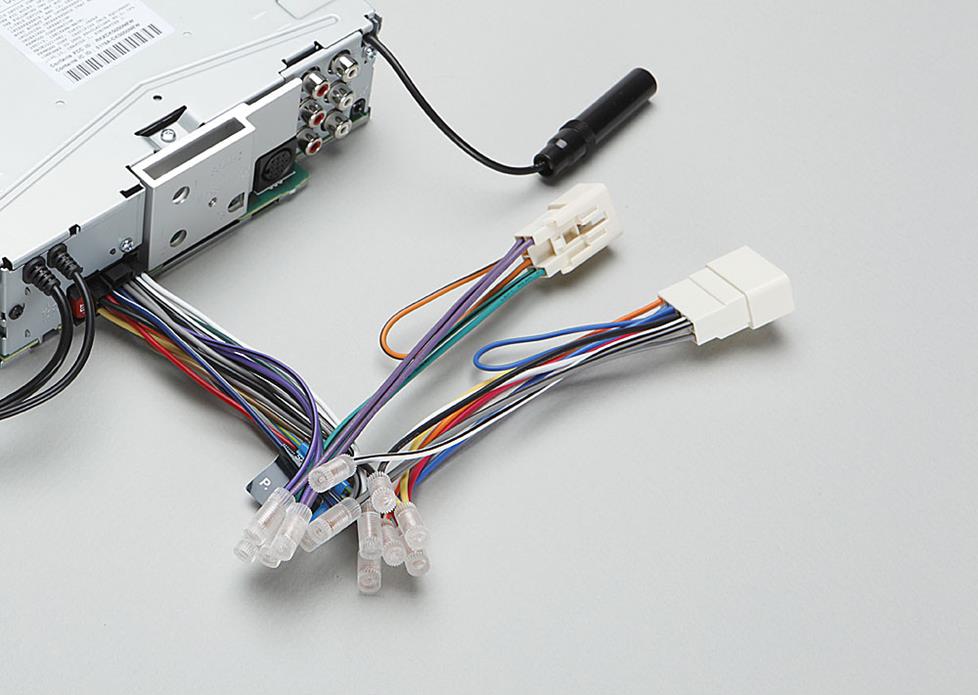
How to wire a car stereo
If Crutchfield carries a vehicle-specific wiring harness for your vehicle, you can use it to connect your new stereo to your vehicle's factory wiring harnesses. This will ensure that everything works seamlessly, merely like the manufactory stereo did.
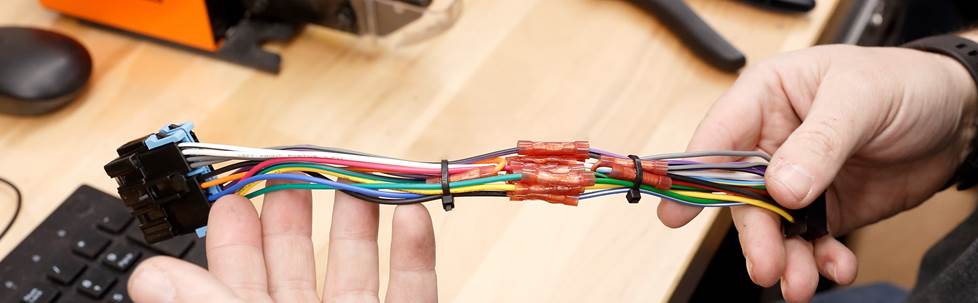
These harnesses usually include a color-coded wiring diagram for connecting the harness to your new stereo. Your new stereo will also include a radio wiring diagram in the possessor's manual. Refer to the ii diagrams to confirm the car stereo wire colors that need to be continued to the adapter harness. The dainty thing is that you tin can make these connections on a workbench, desk-bound, or kitchen table without having to be inside the vehicle.
If a harness is non available for your vehicle or if the factory stereo plug was cutting off, yous'll need to identify each of the auto's stereo wires and connect them to the corresponding wires of your new stereo. If you purchased your new stereo from Crutchfield, our Tech Back up team may be able to tell you the colors and functions of your machine'southward wiring.
Options for connecting the wires
You'll need to fasten bare wires together, and at that place are few ways to do it. Delight avoid only taping the wires together — somewhen the record volition dry out and fall off, exposing the wires and making information technology only a affair of fourth dimension earlier something shorts out. Here are the options that volition give yous secure, lasting connections:
- Solderingcreates a permanent, professional connection that ensures maximum current transfer. We strongly recommend that you lot employ heat-shrink tubing and a oestrus gun to insulate the soldered connection. Nearly purists prefer this method, considering it's the most secure and conductive connectedness for the wiring.
- Posi-Production™ connectors offer a quick and secure twist-on connection for wires, and they can exist re-used. It never hurts to accept a couple of Posi-Tap connectors on hand for various jobs, too. This is our favorite way to get strong connections fast.
- Crimpingis fast and fairly elementary. If yous crimp the wires together, exist sure to use the correct size crimp connector — typical in-dash stereo wires are 18-gauge, only a few use heavier gauge power and basis wires. In that location are several types of crimp connectors, including bullet connectors, butt connectors, or crimp caps.
- Crutchfield ReadyHarness™ service simplifies your installation by letting u.s.a. do most of the piece of work for y'all. We volition take the harness from your new stereo and your vehicle-specific adapter harness and professionally connect the two before we ship your new stereo. We'll allow you know if this service is available for your car when you tell us what you drive and select a new stereo.
Check out our wire connecting videos to see these different methods in action.
Crutchfield ReadyHarness servcie — let united states exercise the work for you
Ability wires
Usually, information technology is all-time to make all of the new stereo's wiring connections via the wiring harness, but if you have to make a direct power connection, you'll need to know the departure between "switched" and "constant" power:
- A switched power source is only on when the ignition is keyed. Connect your new stereo's main (switched) power lead – usually a red wire – to a switched power source, so that the stereo will turn off when you plow off the car, and not drain your vehicle's battery.
- A constant power source is always on. Connect your new stereo's retentivity atomic number 82 – usually a yellowish wire – to a abiding power source, then that you don't lose your radio station presets, tone command presets, and clock settings every time you turn off the vehicle.
Although rare, a few high-powered stereos require you to brand a direct constant ability connexion at the positive terminal of your vehicle's battery. This requires a heavier estimate ability wire, an in-line fuse (usually included), and a ring terminal to connect the power wire to the bombardment clamp. Y'all volition have to route the power wire to the bombardment location, which is often through the vehicle firewall and into the engine compartment in lodge to make the connection at the battery.
Speaker wires
Car stereos have eight wires for the traditional 4-speaker system – a positive wire and a negative wire for the front left, front right, rear left, and rear right speakers. Depending on the wiring configuration in your vehicle and the wiring harness adapter nosotros offering, some of these may non be used.
Ground wire
A proficient ground connection is vital for proper stereo performance and to eliminate unwanted noise. If you are not using a custom wiring harness, wait for a bare, unpainted bolt or screw that contacts the bare metal of your vehicle'southward chassis. Loosen the bolt, slip the ground wire underneath (this is almost ever a black wire), so tighten the bolt. If your footing wire doesn't contact bare metallic, your stereo won't operate. A loose or weak ground connectedness can result in signal noise interfering with your music.
In-dash video — tapping into the parking brake wire
If your new stereo has a touchscreen or video monitor, yous will besides demand to connect a wire to your emergency/parking brake wire. This wire acts as a switch to turn on the video monitor when the parking brake is engaged.
This wire can be in different locations in dissimilar vehicles, depending on the brake configuration. The wire is commonly found where your parking brake is. In vehicles that have a hand brake betwixt the front seats, you'll have to remove the center console to get to it. In vehicles that have a foot-pedal parking brake, the stereo's wire volition need to be routed to it under that dash. Either way, it isn't too hard, merely take your time. And in one case once again, Crutchfield'due south honour-winning tech back up team can be a big help in locating it and helping yous get to it.
Mounting the stereo in the dash
If the original stereo was bolted into the dash, you might need to remove the mounting brackets from the sides of it and attach them to the sides of your new stereo. More likely, you volition need a mounting kit to install the stereo.
If a mounting kit is required, follow the instructions included with the kit. Sometimes you install the kit in the dash, and then slide the new stereo's metal mounting sleeve (if included) into the kit. Secure the metal sleeve by using a screwdriver to bend the sleeve's metal tabs into identify. In other cases, you attach the mounting kit to the new stereo first, then secure both in the dash with screws.
If your vehicle has an upgraded version of the factory sound system (such as a Bose or Harman Kardon upgrade, for example) or an integrated stereo/climate command panel, you will probably need a special factory system wiring adapter in lodge to install a new stereo. An adapter allows you lot to use a new stereo with your existing speaker system. And y'all'll get it at a deep discount when you buy your new stereo from usa.
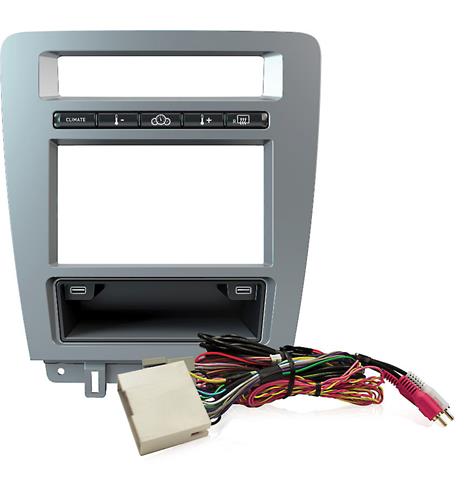
This integration parcel lets you keep the factory LCD screen and touchscreen climate controls in select 2022 and up Ford Mustangs.
Once the dash opening is ready for the new stereo, concord the stereo near the opening. Connect the stereo wiring adapter to the vehicle's wiring harness and plug in the antenna cable. Depending on the stereo you choose, y'all'll likewise need to connect various things to the rear of the stereo, such as the Bluetooth® microphone wire, a USB cable, steering bicycle control interface, or an auxiliary input cable.
Check your work
Slide the stereo into the dash opening, but don't fasten it down merely however. Beginning, examination the stereo to make sure everything is working properly. It's easier to fix a trouble while everything is still exposed.
Annotation: Y'all'll have to reattach the battery cable in order to examination the stereo, so if you disconnected whatever airbag warning plugs, be sure to reattach those before reconnecting the battery.
Turn on the ability and try each source (AM, FM, CD, USB, etc.). And then conform the balance and fader settings to cheque that each speaker is working. Once yous're sure the stereo is wired and working properly, stop securing it in the dash and reinstall any pieces of nuance trim console that you removed.
What well-nigh modifications?
In some vehicles, you might take to make modifications to the dash opening or the surface area inside (what we refer to equally the "dash substructure") in order to install a new stereo. If this is the case for your vehicle, nosotros'll warn you most information technology when you're shopping on our site, and also in your Crutchfield MasterSheet. And once over again, don't hesitate to telephone call our tech support crew if you need whatever guidance.
Fix to try it yourself?
By now you should accept some thought of what is involved in replacing your manufactory stereo with a new, amend, aftermarket stereo. So, it's fourth dimension to bank check out our Crutchfield Outfit My Car tool, where you can tell us what kind of vehicle you have. From in that location, yous'll exist able to run across the details about which stereos, speakers, and other gear will work with your vehicle and also see the installation gear yous'll need to do the chore right.
And if you lot have questions, we're ready for y'all. You lot tin can contact our Advisors via chat or phone.


Source: https://www.crutchfield.com/ISEO-rgbtcspd/learn/learningcenter/car/car_stereo/installation_guide.html
Posted by: rosexyle1976.blogspot.com
0 Response to "How To Install A New Stereo In An Old Car"
Post a Comment